0.2.0 repo
0.2.0 is a departure from the AWS dependent 0.1.0, in favor of a self-hosted style installation. Hetzner is used as the default server host, supported by scripts to manage the stack.
🔗 Create an Awayto Project
🔗 Installation
Clone the repo.
git clone https://github.com/jcmccormick/wc.git && cd wc
Set the awayto binary to be executable.
chmod +x ./awayto
Run the first-time developer setup. This will generate the necessary configurations and artifacts to run the stack locally.
./awayto dev first-run
After this process completes, the platform will be running on a number of docker containers spawned locally on your system. If you visit https://localhost in your browser, you should see this page you’re reading!
🔗 Run the Project
Awayto primarily runs its processes in Docker containers. Upon installation, these containers are built and started for you. In normal development, you may need to stop and start the stack or various parts of it.
# Stop
docker compose down

# Start
docker compose up -d --build
Review the docker-compose.yaml file in the main directory to see what services are started. To rebuild a single service, simply append the service name.
# Rebuild
docker compose up -d --build app
🔗 Software
In no particular order, the following lists the third-party software used in Awayto, along with their key features and a primary source for usage in the system:
| Technology | Description | Source |
|---|---|---|
| Shell | Command-line interface scripting | /bin |
| Typescript | Primary types, api handlers, and components | /core |
| Docker | Container service, docker compose, supports cloud deployments | docker-compose.yaml |
| Kubernetes | Distributed container environment, optional manual deployment path | /kube |
| Postgres | Primary database | /db |
| SQLite | File system database | /fs |
| Node.js | Primary runtime environment | - |
| Yarn | Package management | api package, app package |
| Express.js | API, webhooks | /api |
| Bind9 | Nameservers | ns up |
| Nginx | Reverse proxy, application server, exit server | exit server, reverse proxy |
| ModSecurity | Server security, OWASP coverage | modsec install |
| Fail2Ban | Server security | exit up |
| EasyRSA | Internal certificate authority | builder up |
| Let’s Encrypt | External certificate authority | ns up |
| Tailscale | Managed VPN | deployment up |
| Hetzner | Cloud deployment variant | deployment up |
| AWS | Cloud deployment variant (Future release) | - |
| Keycloak | Authentication and authorization, SSO, SAML, RBAC | /auth |
| Redis | In-memory data store | redis api module |
| Graylog | Log management and analysis, status dashboards | graylog api module, content pack |
| MongoDB | Logging database | container only |
| ElasticSearch | Logging database | container only |
| Hugo | Static site generator for landing, documentation, marketing | /app/landing |
| React | Front-end application library, Craco build customized | /app/website |
| ReduxJS Toolkit | React state management and API service | redux store |
| DayJS | Scheduling and time management library | time utilities |
| Material-UI | React UI framework based on Material Design | module components |
| Wizapp | Custom wrapper around OpenAI API | custom prompts |
| Coturn | TURN & STUN server for WebRTC based voice and video calling | /turn |
| WebSockets | Dedicated websocket server for messaging orchestration, interactive whiteboard | /sock |
🔗 Creating a Feature
A feature can mean a lot of different things. Here we’ll give a quick rundown of what you might need to do when developing a new feature, from the database to the user interface.
Perhaps the most important aspect of any new implementation is the underlying data structure. We can either first create a Typescript type, or a Postgres table, depending on our needs. Generally, both will be necessary, as the Typescript type will be used to represent the Postgres table.
🔗 A Table with a View
All database scripts for the platform are stored in the /db/scripts folder. They will be run the first time the db container runs while using an empty volume. For example, when you run the first time developer installation, a docker volume is created and, since it is empty, the Postgres docker installation will automatically run our database scripts for us. The scripts are named alphanumerically and will be run in that order.
New database scripts can be deployed in various ways. After running the installation, you will have a Postgres container running on your system. You can log into the running Postgres instance by using the dev db CLI command.
./awayto dev db

# run SQL scripts
CREATE TABLE ...
Or we could do it the old fashioned way.
docker exec -it $(docker ps -aqf "name=db") /bin/sh

# connected to the container
su - postgres
psql

# connected to Postgres
\c pgdblocal -- this is the default dev db name

# run SQL scripts
CREATE TABLE ...
To connect to a deployed db, use the util db CLI command.
./awayto util db
# enter the name of your deployment

# run SQL scripts
CREATE TABLE ...
As an example, we’ll setup a basic Todo feature in our app. We’ll make a new file in the scripts folder, /db/scripts/c1-custom_tables.sh. It’s a shell file because this is the chosen method to enact the auto deployment when the Postgres container starts up for the first time. We’ll put the following in our file, as well as run the SQL statement as shown in one of the methods above. Auditing columns are included on all tables.
#!/bin/bash

psql -v ON_ERROR_STOP=1 --username "$POSTGRES_USER" --dbname "$POSTGRES_DB" <<-'EOSQL'

  CREATE TABLE dbtable_schema.todos (
    id uuid PRIMARY KEY DEFAULT uuid_generate_v7(),
    task TEXT NOT NULL,
    done BOOLEAN NOT NULL DEFAULT false,

    -- Auditing Columns:
    created_on TIMESTAMP NOT NULL DEFAULT TIMEZONE('utc', NOW()),
    created_sub uuid REFERENCES dbtable_schema.users (sub),
    updated_on TIMESTAMP,
    updated_sub uuid REFERENCES dbtable_schema.users (sub),
    enabled BOOLEAN NOT NULL DEFAULT true
  );

EOSQL
You’ll notice we nest our tables in the schema dbtable_schema. There is also dbview_schema and to this we will add a simple view to wrap our usage. Views are the primary way data will be queried when we get to creating our API functionality. We’ll create another new file /db/scripts/c1-custom_views.sh with our view. Remember to also run the SQL script in the db container as described previously.
#!/bin/bash

psql -v ON_ERROR_STOP=1 --username "$POSTGRES_USER" --dbname "$POSTGRES_DB" <<-'EOSQL'

  CREATE
  OR REPLACE VIEW dbview_schema.enabled_todos AS
  SELECT
    id,
    task,
    done,
    created_on as "createdOn",
    row_number() OVER () as row
  FROM
    dbtable_schema.todos
  WHERE
    enabled = true;

EOSQL
A few important callouts about view structures and project conventions:
- Generally views represent active or enabled records, so we name the view as such,
enabled_todos. In some situation where we need to hide a record from the set for some reason (soft-delete, data retention, etc.), we can make use of the enabled flag. - Views are the primary transition layer between the database schema and the application layer. Database naming conventions follow snake-case naming, while the application uses camel-case. This conversion occurs in the view where applicable.
- A row number can be added for ordering within the set where needed.
🔗 Core Types
Whether represting data structures from a custom process, external API, or database table, we use Typescript to define the type of data usable throughout the application layer. Types are primarily used in the API or UI. To make our types available to the stack, we can define it in the /core/src/types folder.
Using our Todo example, we create a new file in the core types folder to support our Todo feature, /core/src/types/todo.ts. Files are named using the singular variant of objects, as are most of an object’s constructs. One exception is endpoint URLs, which use plural form, todos.
export type ITodo = {
  id: string;
  task: string;
  done: boolean;
  createdAt: string;
  row: number;
}
As expected, we define a structure matching the output of the view we created earlier. Prefixing our object name with I isn’t quite Hungarian notation in this case. Instead, it’s just a quick way to denote that the type is Internal, i.e. we made it as application developers; its name likely won’t ever conflict with third-party libraries. With this definition in place, we can now utilize this type in the API or React app. Next we’ll expand this same file with our desired API endpoint definitions.
Note: Any time you add a new file or update to the core package, it’s generally a good idea to fully restart any running dev servers when developing the API or UI.
🔗 Defining API Endpoints
Endpoint definitions are one of the most powerful abstractions available, due to their expressivity, simplicity, and far-reaching effects. After hooking up our definition, we get to benefit from automated server-side request validation, auto-generated React hooks, and support for an API handler that we can customize.
In order to define an endpoint, we can expand the same core type file we created for our type, /core/src/types/todo.ts. You can of course create stand-alone APIs that aren’t related to a type; just follow the conventions here in a new file in the core types folder.
- The default export of a
/core/src/typesfile is treated as an object of endpoint definitions. You can see how the exports are used and merged in the core type index. - All top-level definition attributes (
kind,url,method, etc.) must be defined. Endpoint definitions use Typescript’sas conststatement, therefore all definitions must be alike in structure.as constlets us use our object at runtime, while establishing narrow types for our overall usage with Typescript related features. In other words, if we had only defined the followingexport defaultconstruct as a Typescript type, we wouldn’t get to use any of its details at runtime. Instead, creating an object that usesas constis more or less the best of both worlds for our needs.
import { ApiOptions, EndpointType } from './api';
import { Void } from '../util';

// Typescript type resides here, then we export the API definition...

export default {
  postTodo: {
    kind: EndpointType.MUTATION,
    url: 'todos',
    method: 'POST',
    opts: {} as ApiOptions,
    queryArg: { task: '' as string },
    resultType: { id: '' as string }
  },
  putTodo: {
    kind: EndpointType.MUTATION,
    url: 'todos',
    method: 'PUT',
    opts: {} as ApiOptions,
    queryArg: { done: true as boolean },
    resultType: { success: true as boolean }
  },
  getTodos: {
    kind: EndpointType.QUERY,
    url: 'todos',
    method: 'GET',
    opts: {} as ApiOptions,
    queryArg: {} as Void,
    resultType: [] as ITodo[]
  },
  getTodoById: {
    kind: EndpointType.QUERY,
    url: 'todos/:id',
    method: 'GET',
    opts: {} as ApiOptions,
    queryArg: { id: '' as string },
    resultType: {} as ITodo
  },
  deleteTodo: {
    kind: EndpointType.MUTATION,
    url: 'todos/:id',
    method: 'DELETE',
    opts: {} as ApiOptions,
    queryArg: { id: '' as string },
    resultType: { success: true as boolean }
  }
} as const;
kind: MUTATION or QUERY. In practice QUERY is used for all GET requests. MUTATION is used for everything else. When we use MUTATION, our usage of the database inside API handlers is automatically wrapped in a transaction.url: URLs are supported with common path and query param usage; these properties must be provided in the queryArgs object and passed on calling the endpoint. For example,todos/:idwould expect us to haveidlisted inqueryArgs. Alternatively we could writetodos?id=:id, depending on your needs. In the API handler, these properties are available withprops.event.pathParametersorprops.event.queryParameters, respectively.method: GET, PUT, POST, DELETEopts: Optional configurations. Listed here.queryArg: A combination of path, query, and request body parameters. This determines what we require to make a request from the front-end, and what is available to us in the API’s handler.resultType: The API handler must return something matching this type, or throw an error.- A negative side-effect of using
as constrequires us to define types for each property inqueryArgandresultType(i.e.id: '' as string). This is so our IDE can handle both generic and narrow typing of the endpoint definitions; this is important when we go to build and use hooks and API handlers. - Defining
{} as VoidforqueryArgorresultTypewill supply API handlers and React hooks with the correct types when no parameters are necessary.
Extend the Type exports
Once you’ve created your API definition, you need to hook it in to the merged API definitions. You can find the merged definitions in /core/src/types/index.ts.
- Import your new type file
- Add its reference to
siteApiRef - Export the reference from the index
🔗 Handling an API
At this point, we’ve set up some data structures around our feature, including some endpoints and params we can interact with. To handle the endpoint from the API context, we’ll make a new file /api/src/handlers/todo.ts. Just like we did with our core type folder definitions, we’ll import our new API handler file into /api/src/handlers/index.ts. Add this file reference to createHandlers, which is a simple utility function to merge all of our endpoint definitions into an object which is bound to the endpoint definitions we’re exporting from the core types folder.
In our handler file todo.ts, we’ll import createHandlers, to again make use of that binding, and begin crafting a new object. Intellisense will show us all the available endpoints we can define. It’s important to note that all endpoint definitions exported from the core package must be accompanied by a corresponding handler, otherwise the api package will not compile.
Using the POST method from our Todo example, the definition specifies a “task” as query argument, and we should return an “id”. To do this we’ll use a simple SQL query using the pg-promise client via props.tx since this is a MUTATION. If we were otherwise writing the handler for a QUERY, we would just use props.db.
import { createHandlers, ITodo } from 'awayto/core';

export default createHandlers({
  postTodo: async props => {
    const { id } = await props.tx.one<ITodo>(`
      INSERT INTO dbtable_schema.todos (task)
      VALUES ($1)
      RETURNING id
    `, [props.event.body.task]);

    return { id };
  },
  // Make sure to define the rest of the handlers below
});
That’s all there is to API handlers. Now our Express app is exposing the POST /api/todos endpoint. Check out the existing handlers in /api/src/handlers for examples of what can be done, as well as the API Props and Functionality guide to learn more about what’s available in the props object and its features.
🔗 Creating a Component
All of the front-end elements of the platform reside in the /app folder. Within, you will find three important folders as well as the Dockerfile which builds the app service.
/landingis a Hugo application, the contents of which you are reading right now!/servercontains Nginx configurations for local or deployed environments./websiteis a React application, built with customized Craco configuration.
For this exercise we will just focus on the /app/website folder, in order to make a front-end component which can utilize our Todos API. Begin by creating a new file in /app/website/src/modules/example/Todos.tsx. The UI is implemented primarily using React functional components. Here we’ll provide a sample component using basic React constructs with Material-UI, then describe the important aspects:
import React, { useState } from 'react';
import TextField from '@mui/material/TextField';

import { sh, useUtil } from 'awayto/hooks';

export function Todos (): React.JSX.Element {

  const { setSnack } = useUtil();
  const [postTodo] = sh.usePostTodoMutation();

  const [todo, setTodo] = useState({
    task: ''
  });

  const handleSubmit = () => {
    const { task } = todo;

    if (!task) {
      setSnack({ snackType: 'error', snackOn: 'You must have something todo!' });
      return;
    }

    postTodo({ task });
  }

  return <>
    <TextField
      id="task"
      label="Task"
      name="task"
      value={todo.task}
      onKeyDown={e => {
        if ('Enter' === e.key) {
          void handleSubmit();
        }
      }}
      onChange={e => setTodo({ task: e.target.value })}
    />
  </>;
}

export default Todos;
🔗 Development
Like any full-stack implementation, Awayto has its own concept of the file system, modularization, and deployments. It is built as a monorepo, but its function depends on multiple containers working together. This is the case for both local and deployed environments. Beyond this, we have to consider the needs of a production environment versus a development environment. The CLI bridges these concerns by being a unified interface to manage both the development and deployment of the platform.
The root url / of the application will serve the built Hugo project. Hugo is used because it is a lightweight static site generator. Ultimately, we want a separation between the javascript application we’re creating and a landing/marketing page containing other beneficial information. Using Hugo as a first point of entry means the end-user experiences extremely fast response times on their first visit to the site. Later on, when they go to access the application at the /app route, and need to download the related javascript, such can be done in an incremental fashion; the user isn’t innundated with downloading resources on their first visit.
🔗 Application Architecture
For the purposes of core development, services are defined in a central docker-compose file in the root of the project. Here’s a brief overview of each and their ports. You can find a root-level folder for each in most cases, containing its own Dockerfile.
| Name | Purpose | Ports |
|---|---|---|
| app | An Nginx host for reverse proxying to other services, and serving Hugo and React files. | 80, 443 |
| api | Express.js in a node alpine container. | 9443 |
| db | Postgres in its managed alpine container. | 5432 |
| redis | Redis in its managed container. | 6379 |
| fs | A custom file storage implementation, utilizing SQLite and Socat in an alpine container. | 8000 |
| auth | Keycloak in its managed container. | 8080, 8443 |
| sock | A custom websocket server in a node alpine container. | 8888 |
| turn | Coturn in its managed container, using host network to handle port assignments. | 3478, 44400-44500 UDP |
| mongo | MongoDB in its managed container. | 27017, used by Graylog only. |
| elasticsearch | Elasticsearch in its managed container. | 9200, used by Graylog only. |
| graylog | Graylog in its managed container. | 9000, 1514 TCP/UDP, 12201 TCP/UDP |
| TBD | TBD |
When starting the stack with docker compose up -d, all these ports should be available on the host system. You can review the compose file to see which services depend on others. Not all services are required to be run at the same time. For example, it’s often the case we’ll stop graylog when developing locally, docker compose stop graylog mongo elasticsearch.
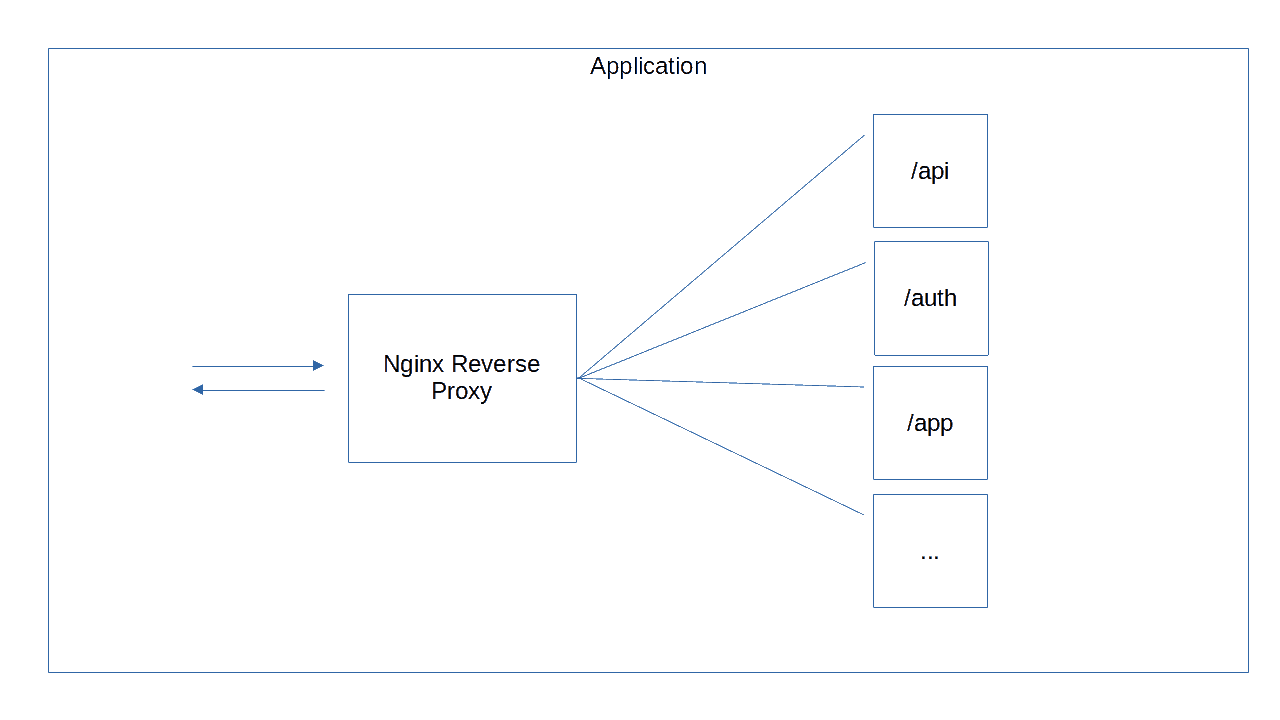
With regard to service routing, most services are configured to directly communicate with each other utilizing Docker’s networking capabilities. However, to simplify communication with external requests, we use Nginx as a reverse proxy. This way, consumers need only interact with a single host to gain access to platform features.
🔗 Deployment
Awayto runs and can be developed on a single system. First and foremost, it is standalone piece of software that can be run on your own system, or configured to be deployed to a network that you control. It is bare-metal first and no cloud usage is required. But we are also interested in operating in a distributed fashion, whether in the cloud or on networks we own.
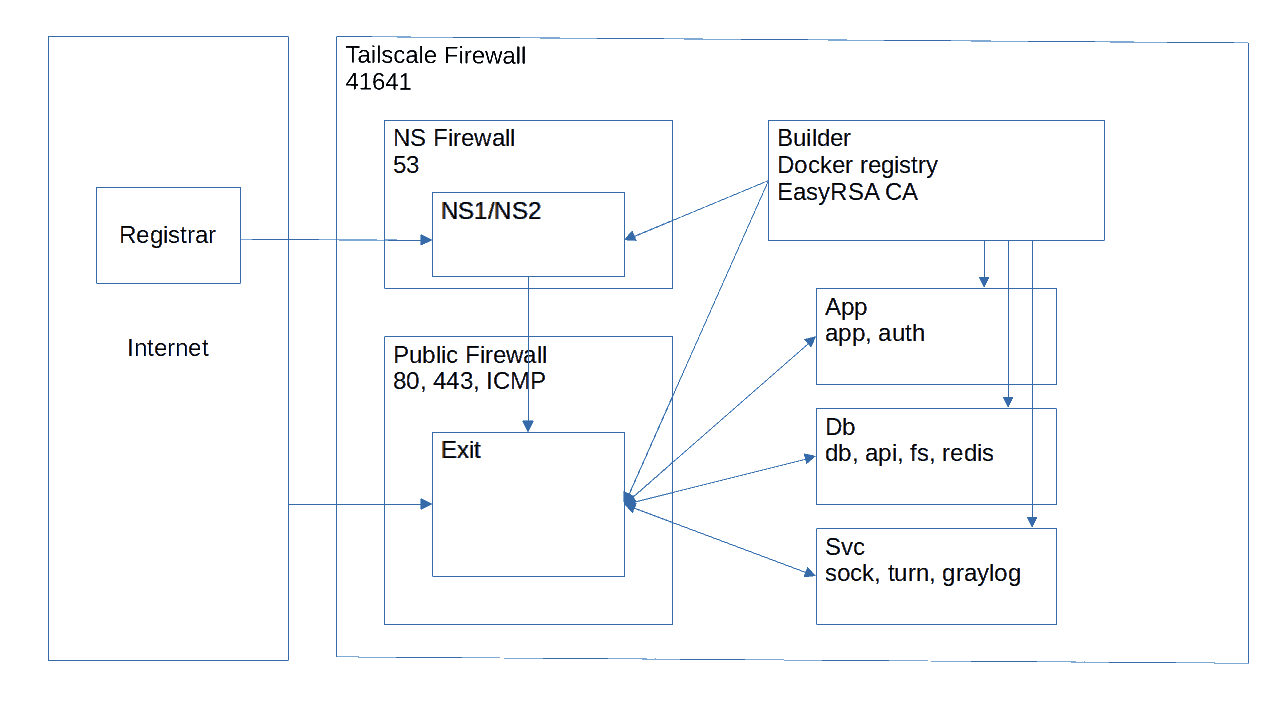
Deploying Awayto in the cloud allows us to demonstrate applications of self-hosting and maintaining an internal network. After installing the repo, you can optionally deploy it so far using Tailscale and Hetzner. In the spirit of the software, you are encouraged to review the deployment scripts and adjust them to your needs, or throw them out all together.
In a distributed deployment, containers are evaluated and grouped based on their footprint and relation to other services. The following is a high level view of the platform when it is deployed.
🔗 Guides
Check out these guides for specific information about how lower-level parts of the platform function.
🔗 API Options
All API endpoint definitions (described in Defining API Endpoints) conform to the same structure so they can eventually be merged together during compilation. This dictates the top-level structure of the definition, which is rigid but useful. The attribute opts allows for optional configuration, extending endpoint definitions as needed. For most endpoints opts will be defined as an empty object. Currently supported options are as follows:
export type ApiOptions = {
  readonly cache?: 'skip' | number | boolean | null | undefined;
  readonly load?: boolean | undefined;
  readonly throttle?: 'skip' | number | undefined;
  readonly contentType?: string | undefined;
}
cache:- Only GET requests are cached.
- GET requests are cached automatically, unless they are marked with
'skip'. - Any non-GET request resets the cache for that same URL, as a mutation should have occured.
- The minimum duration for caching a GET request is 180 seconds, unless specified by a number.
nullwill cache the response indefinitely.
load: Forces a loading screen during transmission.throttle: Throttle the endpoint. The default rate limit is 10 requests per 10 seconds. A throttle of 60 would allow for 10 requests per minute; 1 would allow for 10 requests per second.contentType: Currently the only supported alternative content type isoctet-stream, which is used for file uploads.
🔗 API Props and Functionality
An API handler is an asynchronous function taking a single parameter, props, which provides access to functionality and user resources. For the most part, we can get by with everything we’ll find in props. But, as we’ll see, there are other tools in our bag we can reach for when interacting with the API.
To begin with, all requests contain an event, accessed at props.event. The event type is a generic which expects typeof queryArg from an endpoint definition. The following describes all of the pieces of data available in the event:
export type ApiEvent<T extends AnyRecord | AnyRecordTypes> = {
  requestId: string;
  method: string;
  url: string;
  public: boolean;
  userSub: string;
  sourceIp: string;
  group: Partial<IGroup>;
  groups?: string[];
  availableUserGroupRoles: UserGroupRoles;
  pathParameters: Record<string, string>;
  queryParameters: Record<string, string>;
  body: T;
}
requestId: Every request is given a unique id.method: The method of the request.url: The matching endpoint definition URL.public: deprecated Internal public flag.userSub: The user’s subject claim as determined by Keycloak.sourceIp: An anonymized version of the user’s ip address.group: The user session’s current group.groups: A reference to the user’s groups.availableUserGroupRoles: Listing of user’s roles within each group, and the action-groups available to them.pathParameters: An object of any path paramters as denoted by endpoint URL definitions.queryParameters: An object of any query parameters as denoted by endpoint URL definitions.body: The body of the request, which assumes the shape of thequeryArgparameter of an endpoint definition.
Now that we understand the metadata we can work with in every request, using the props.event accessor, let’s look at the functionality available to each request.
export type ApiProps<T extends AnyRecord | AnyRecordTypes> = {
  event: ApiEvent<T>;
  db: IDatabase<unknown>;
  fetch: typeof fetch;
  logger: graylog;
  redis: RedisClientType;
  redisProxy: RedisProxy;
  keycloak: KeycloakAdminClient & KcSiteOpts;
  fs: FsFunctionalities;
  ai: AiFunctionalities;
  tx: ITask<unknown>;
}
event: Described above.db: Apg-promisebased database client.fetch: NodeJSfetchlibrary.logger: A simple logging utility for sending messages to our Graylog instance.redis: NodeJSredislibrary.redisProxy: A server-localrediscache for commonly used server configurations.keycloak: NodeJSkeycloak-admin-clientlibrary.fs: A set of functions to store, expire, and get files from the file storage instance.ai: Application wrapper around thewizapppackage.tx: When in a MUTATION-based handler, this is the available database transaction.
🔗 Socket Basics
Real-time communications are supported by a standard Coturn container and a custom WebSocket Server implemented in a NodeJS container. In the React app, you will find corresponding elements which enable the use of voice, video, and text communications. The tree of our React app is constructed in such a way that, as authenticated users begin to render the layout, a React provider/context instantiates a long-lived WebSocket connection for use anywhere in the app. Using the WebSocket context, we get access to the most basic features of a socket connection, which follows a typical topic pub/sub implementation.
type WebSocketContextType = {
  connectionId: string;
  connected: boolean;
  transmit: (store: boolean, action: string, topic: string, payload?: Partial<unknown>) => void;
  subscribe: <T>(topic: string, callback: SocketResponseHandler<T>) => () => void;
}
connectionId: A one-time global identifier for this connection to the socket server. There is currently no tracking for connections across browser tabs; so if you open a new tab, you will get a new connection id, etc.connected: Current connection state.transmit:store: Settingtruewill store transmitted messages in the database tabledbtable_schema.topic_messages.action: The type of message as it pertains to functionality of the socket. For example, when creating a chat you might have an action to signify when usersjoinorleavethe chatroom.topic: The channel or room in which messages will be sent.payload: The message being sent. Generally a simple key/value pair.
subscribe: Join a user to a specific topic and set up a callback for how messages receipts should be handled on the client. A type can be supplied in order to specify the type of payload that is returned in the callback.
The WebSocket context itself is pretty low level, and there are still some very generic usecases we can cover with high-level abstractions, such as managing client-side connections, disconnections, and user lists. For this we make use of a React hook that is more readily usable, useWebSocketSubscribe. Here is a trivial but complete implementation of the hook to see how it can be used:
import React, { useState } from
import { useWebSocketSubscribe } from 'awayto/hooks';

declare global {
  interface IProps {
    chatId?: string;
  }
}

export function UserChat({ chatId }: IProps): React.JSX.Element {

  const [messages, setMessages] = useState([])

  // Here we'll instantiate the socket subscription with an arbitrary 'chatId' (which should be the same for all participants), and a very simple payload of { message: string }, which could be any structure necessary depending on the feature being implemented
  const {
    userList,
    subscriber,
    unsubscriber,
    connectionId,
    connected,
    storeMessage,
    sendMessage
  } = useWebSocketSubscribe<{ message: string }>(chatId, ({ timestamp, type, topic, sender, store, payload }) => {

    // Received a new message
    const { message } = payload;

    // A single user could have multiple connections,
    // so we need to iterate over their connection ids and then extend our messages collection
    for (const user of userList.values()) {
      if (user.cids.includes(sender)) {
        setMessages(m => [...m, {
          sender,
          message,
          timestamp
        }]);
      }
    }

  });

  useEffect(() => {
    // Someone joined the chat
  }, [subscriber]);

  useEffect(() => {
    // Someone left the chat
  }, [unsubscriber]);

  const messageHandler = (message: string) => {
    // To store the message in the database
    storeMessage('stored-message', { message }); // This { message } payload is bound by the type supplied to `useWebSocketSubscribe`

    // Or just send a message between clients
    sendMessage('normal-message', { message }); // It doesn't matter what the type is, but 'normal-message' will be available in the callback of `useWebSocketSubscribe` as `type` for further handling if needed
  }

  return <>
    {/* render the messages */}
  </>
}
There is a lot we can accomplish with the useWebSocketSubscribe and it can be configured for any pub/sub related context. For a look at more advanced uses of the socket, review the Call provider, Text provider and Whiteboard component to see how multiple actions can be utilized more fully, how to handle subscribers, and more.
Less Basic: Socket Authorization and Allowances
The WebSocket protocol does not define any methods for securing the upgrade request necessary to establish a connection between server and client. However, authenticated users will have an ongoing session in our Express API. Therefore we can use it to ensure only authorized users can access the socket by using a ticketing system. Once the user is connected, the socket server can then handle its own requests in seeing which topics the user is allowed to connect to.
In the API, we will find a dedicated set of routes for use with the socket server. The socket auth flow is as follows:
- the browser makes a request to
/ticket - the API proxies this request to a ticket creation end point on the socket server, which is keeping track of currently connected subscribers and their tickets/allowances
- the browser receives a
connectionId:authCodestyle pairing from/ticketwhich it uses to make the upgrade request - a request is made to the reverse proxy’s
/sockendpoint, configired as an UPGRADE and forwarded to the socket server - the socket server checks the incoming
authCodeagainst what has been stored on the server, expiring the ticket - the request is upgraded to a web socket connection and the browser can proceed to send messages using the
connectionId
After having connected, the client can use the transmit function described previously to send a 'subscribe' action, along with the desired topic. An abstracted example of this process is used in the useWebSocketSubscribe hook.
While subscribing to a topic, the socket server must ensure the user is allowed. This can be done in many different ways depending on the purpose of the socket connection. Currently the only implementation for socket comms is based around the Exchange module, which handles meetings between users. Exchanges are a record representing what happens in a meeting. The meeting itself (date, time, participants, etc.) is a separate record called a Booking. Users joining an Exchange chatroom are required to be related to that booking record id in the database. This is a complex interaction but ensures participants are valid for a given topic. Using the Exchange module as an example, we’ll break down the process here:
-
The users clicks, for example, a link which redirects them to
/app/exchange/:idusing a booking id, which routes them to the Exchange component, and pulls out the ID as a parameter. -
The Exchange module is wrapped, using either the Text or Call providers, using a relevant topic name and the ID parameter:
<WSTextProvider
  topicId={`exchange/text:${exchangeContext.exchangeId}`}
  topicMessages={topicMessages}
  setTopicMessages={setTopicMessages}
>
  <WSCallProvider
    topicId={`exchange/call:${exchangeContext.exchangeId}`}
    topicMessages={topicMessages}
    setTopicMessages={setTopicMessages}
  >
    <ExchangeComponent />
  </WSCallProvider>
</WSTextProvider>
-
The text or call provider internally attempts to subscribe to our topicId, e.g.
exchange/text:${exchangeContext.exchangeId}. The socket server is responsible for checking the users’s allowances at the moment of subscription. This process comes together in the socket server’s subscribe function. -
At the start of subscribing, the socket server makes a request to
/api/allowances. The API returns the list of booking ids which are relevant to the current user and attaches them to thews.subscriber.allowancesobject. -
A switch handler makes an arbitrary check to determine if the user has access to the topic id being requested. In the case of the booking/exchange system, this is very basic.
export const exchangeHandler = (ws, parsed) => {

  const [topic, handle] = parsed.topic.split(':');

  switch(topic) {
    case `exchange/${ExchangeActions.EXCHANGE_TEXT}`:
    case `exchange/${ExchangeActions.EXCHANGE_CALL}`:
    case `exchange/${ExchangeActions.EXCHANGE_WHITEBOARD}`:
      return ws.subscriber.allowances.bookings.includes(handle);
    default:
      return false;
  }
}
-
If the handler finds that the user is related to the booking id they are requesting for, the subscribe function continues on with all the wiring up of a user’s socket connection.
-
Now inside our Exchange component, we can tap into the text or call contexts.
🔗 Voice, Video, and Text
Communcations functionalities are core to the system, and the platform offers some built-ins to make real-time applications easier to implement. These come in the form of React contexts, so you can build components that work across the application, and aren’t tied to any pre-existing components. Unlike the base web socket context, which wraps the application at a high level, these built-ins should be used where needed by wrapping your desired components in the given context’s provider. Once familiar with their usage and purpose, it is encouraged to dive deeper by customizing the providers themselves, as they can extend the look and function of the components used internally.
Text Messaging Context
type WSTextContextType = {
  wsTextConnectionId: string;
  wsTextConnected: boolean;
  chatLog: React.JSX.Element;
  messagesEnd: React.JSX.Element;
  submitMessageForm: React.JSX.Element;
}
wsTextConnectionId: The connection id of the underlying socket.wsTextConnected: The connection status.chatLog: A styled element containing the chat logs.messagesEnd: A helper element to “scroll-to-bottom” of the chat log where needed.submitMessageForm: An input box to submit a message to the channel.
Text Provider Usage
As mentioned, to utilize the context, we need to wrap our component with the context’s provider, WSTextProvider. Upon doing so, the channel can be configured with a unique topic id, which signifies the “room” that our users are joining. As well, we maintain the set of topic messages outside of the provider, so that they can be passed around as necessary to other components. For example, if you nested the call provider inside the text provider, and both of them shared the same topic messages, this would enable the chat components to say things like “John joined the call.”
import React, { useState, useContext } from 'react';

import Grid from '@mui/material/Grid';

import { SocketMessage } from 'awayto/core';
import { useComponents, useContexts } from 'awayto/hooks';

function ChatLayout(): React.JSX.Element {

  const {
    chatLog,
    messagesEnd,
    submitMessageForm
  } = useContext(useContexts().WSTextContext) as WSTextContextType; // Context types are declared globally and don't need to be imported

  return <>
    <Grid container direction="column" sx={{ flex: 1 }}>
      <Grid item sx={{ flex: '1', overflow: 'auto' }}>
        {chatLog}
        {messagesEnd}
      </Grid>

      <Grid item pt={1}>
        {submitMessageForm}
      </Grid>
    </Grid>
  </>;
}

export default function GeneralChat(): React.JSX.Element {

  const { WSTextProvider } = useComponents();

  const [topicMessages, setTopicMessages] = useState<SocketMessage[]>([]);

  return <>
    <WSTextProvider
      topicId={'general-chat'}
      topicMessages={topicMessages}
      setTopicMessages={setTopicMessages}
    >
      <ChatLayout />
    </WSTextProvider>
  </>;
}
Call Context
The call context sets up the elements needed to manage a WebRTC voice and video call. The socket connection is used internally to route messages to peers in order to setup a peer-connection using the Coturn server. From there, users are directly connected using the WebRTC protocol. The props of the built-in context allow for the construction of a voice and video chatroom components.
type WSCallContextType = {
  audioOnly: boolean;
  connected: boolean;
  canStartStop: string;
  localStreamElement: React.JSX.Element;
  senderStreamsElements: (React.JSX.Element | undefined)[];
  setLocalStreamAndBroadcast: (prop: boolean) => void;
  leaveCall: () => void;
}
audioOnly: Once a call is started, this flag can be used for various layout needs.connected: The current status of the call.canStartStop: This prevents repeated start/stop attempts while a call is already being started/stopped. An empty string means a call is in the process of starting; a value of'start'implies there is no ongoing call,'stop'means a call has started and can be stopped (usingleaveCall).localStreamElement: A component for the current user’s own video rendering area.senderStreamsElements: An array of video components for each peer in the call.setLocalStreamAndBroadcast: A handler allowing the current user to join the call. Passingtruewill allow video to be sent. Passing nothing or false will only join the call with audio.leaveCall: A handler to leave a call if currently connected.
Call Provider Usage
Much the same as the texting context, we must wrap our call layout using the call provider, WSCallProvider. Then we can lay out the components as needed for our call.
import React, { useState, useContext } from 'react';

import Grid from '@mui/material/Grid';
import Button from '@mui/material/Button';

import { SocketMessage } from 'awayto/core';
import { useComponents, useContexts } from 'awayto/hooks';

function CallLayout(): React.JSX.Element {

  const {
    audioOnly,
    connected,
    localStreamElement,
    senderStreamsElements,
    setLocalStreamAndBroadcast,
    leaveCall
  } = useContext(useContexts().WSCallContext) as WSCallContextType; // Context types are declared globally and don't need to be imported

  return <>
    <Grid container direction="column" sx={{ backgroundColor: 'black', position: 'relative', flex: 1 }}>
      {localStreamElement && <Grid item xs={12}
        sx={{
          position: senderStreamsElements.length ? 'absolute' : 'inherit',
          right: 0,
          width: senderStreamsElements.length ? '25%' : '100%'
        }}
      >
        {localStreamElement}
      </Grid>}
      {senderStreamsElements.length && senderStreamsElements}
    </Grid>

    {connected && <Button onClick={() => leaveCall()}>
      Leave Call
    </Button>}

    {!connected || audioOnly && <Button onClick={() => setLocalStreamAndBroadcast(true)}>
      Join with Voice & Video
    </Button>}

    {!connected && <Button onClick={() => setLocalStreamAndBroadcast(false)}>
      Join with Voice
    </Button>}
  </>;
}

export default function GeneralCall () {

  const { WSCallProvider } = useComponents();

  const [topicMessages, setTopicMessages] = useState<SocketMessage[]>([]);

  return <>
    <WSCallProvider
      topicId={'general-call'}
      topicMessages={topicMessages}
      setTopicMessages={setTopicMessages}
    >
      <CallLayout />
    </WSCallProvider>
  </>;
}
For our actual implementation and usage of the call and text providers, check out the Exchange module. There, we combine voice, video, text, as well as a collaborative socket driven canvas.
🔗 Dynamic Component Bundling
As a project grows larger, there should be some control around how the project is bundled and served to the client. In our case, Awayto utilizes React as a front-end library to construct and execute our component library. As part of React, we get access to the Suspense and Lazy APIs, which enable us to gain that bit of control we need.
With modern JavaScript bundlers, we can make use of tree-shaking and code-splitting to output our project into file chunks. This ultimately means a client only downloads components that it needs to render in real-time. And as most components will be small in nature, these added requests aren’t too big of a deal in the grand scheme of load times.
To accomplish this, we use a mixture of some build-time scripting,the JavaScript Proxy API, as well as the aforementioned React APIs, Suspense and Lazy.
- As part of our CRACO configuration, the function
checkWriteBuildFileparses the structure of our/app/website/src/modulesfolder, and writes a manifest for all the components and contexts available to us. This manifest is stored in/app/website/src/build.json. - In our series of React hooks,
useComponentsanduseContextsuse the manifest to load files when needed, and keep a local cache of downloaded components. - By using the Proxy API, our hook allows us to download/use a component just by accessing it as a property of
useComponents(oruseContexts).useContextswill pick up any file ending withContext, so beware. - If a component doesn’t exist, an empty div will be rendered instead. With advanced usage, we can feature-lock components from being used without running into compilation errors in the event a component isn’t in the file system.
import { useComponents } from 'awayto/hooks';

export default SomeComponent() {
  const { MyComponent, DoesntExist } = useComponents();

  return <>
    <MyComponent /> {/* All good! */}
    <DoesntExist /> {/* This will just render an empty <div /> */}
  </>
}
As a result of this method, we incur some side effects. For example, you will notice that at no time is “MyComponent” imported anywhere. What this means is we lose static analysis when it comes to build time type checking, error handling, and so forth. The builder knows that we have a module folder full of React components, and it will build each one into its own chunk as necessary. However, it won’t know how files are interconnected and used within one another. As we use TypeScript, this means we need a way to share types across the project. The solution is to globally extend our component properties interface whenever and where-ever we are making the component, which is seen in many of the existing components. Random example:
// ...
declare global {
  interface IProps {
    pendingQuotesAnchorEl?: null | HTMLElement;
    pendingQuotesMenuId?: string;
    isPendingQuotesOpen?: boolean;
    handleMenuClose?: () => void;
  }
}

export function PendingQuotesMenu({ handleMenuClose, pendingQuotesAnchorEl, pendingQuotesMenuId, isPendingQuotesOpen }: IProps): React.JSX.Element {
// ...
Now when we go to implement this component in other components, using the useComponents hook, we can properly utilize the prop types. Beware of using the same prop type names in different components, as we are extending a global interface.
An arguably large benefit of all of this is that our first-time visit to the site more or less incurs the same, small, package download size. We don’t bundle all our components into one large file, and they are loaded asynchronously on-demand. So the initial app download size will remain small (less than 1 MB!; mostly the styling libraries) even with thousands of components in the system. Whether or not this is useful to your specific project is for you to determine; the use of useComponents or useContexts isn’t compulsory.